Cassandra gets in BlaBlaCar

Overview

Promote and introduce a new kind of datastore in a company is always quite tricky. Beyond the necessary explanation how this new technology meets expectations, the most important task is to support change and help developer teams to take advantage of it.
BlaBlaCar is a trusted community marketplace that connects drivers with empty seats to passengers looking for a ride. It is a fast-growing French firm delivering ride-sharing service across 14 countries including India. With 200+ people and 11+ million users with international growth rate exceeding 500,000 new users monthly, Data flow is becoming really huge!
As a former consultant in BigData (@NickyintheCloud), I’ve been mandated by BlaBlaCar to set up and steer a Data Team of which one of the main tasks is to migrate some entities from traditional relational databases like MySQL to Cassandra and prepare the company to tackle Data pressure especially on a multi-region context.
The purpose of this document is not to present how we, the Data Team, are designing Cassandra tables in a query driven approach but how by a funny and interactive demo with raspberries and elbow grease, it is possible to propagate the Cassandra spirit to tech teams! Oh ya!
The demo
There are some very good posts on the web for setting up Cassandra clusters with Raspberry Pies and the C* Summit 2013 presentation by @AndyCobley, great job guys it was really inspiring!
This new demo, based on Cassandra & Raspberry Pi, is not only intended to set up a multi-DCs high-resilient cluster but also to demonstrate how efficient the cassandra consistency levels tuning for write operations is!
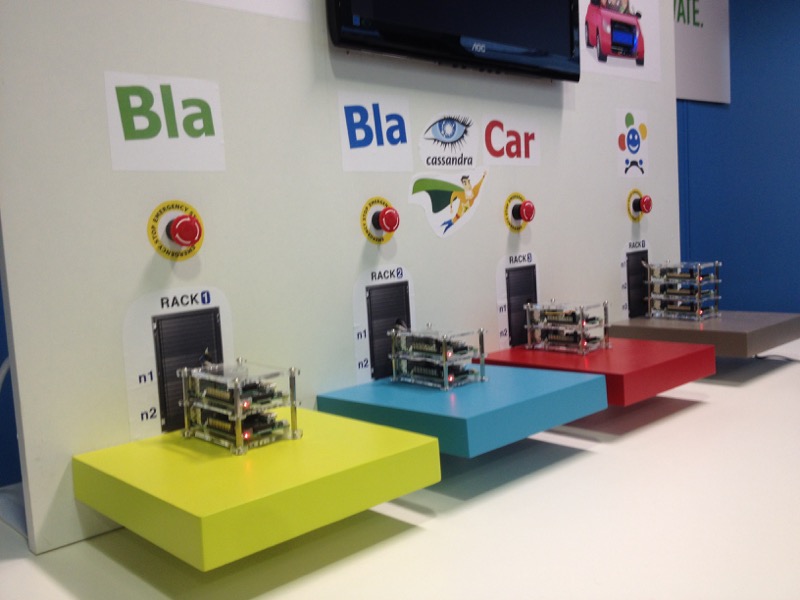
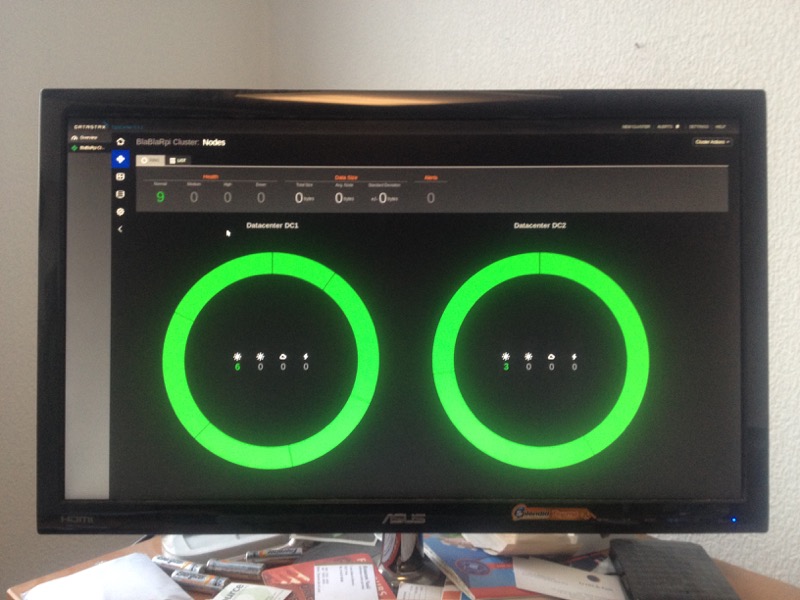
As you could see above on the final demo panel, we have many elements to illustrate Cassandra resiliency:
- multi-DC context (2 DCs)
- multi-rack per DC (DC1 : 3 racks, DC2 : 1 rack)
- emergency stop buttons for shutting down rack by rack..(goshhhh !)
- some clients (led display upper right) writing to cluster
- Monitor with DataStax OpsCenter for monitoring cluster
- …
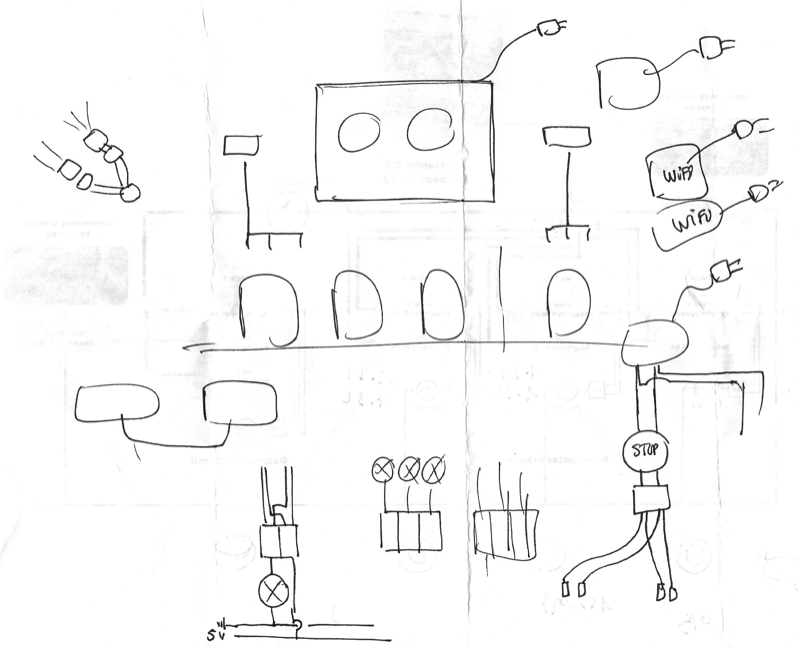
It all started with some rough sketches to more accurate schemas with the objective to demonstrate how a Cassandra cluster could resist to rack & DC losses and how we could tune writing to the cluster from a client aspect.

Let’s make it !
What you need
You will find below a list of all the material needed for this demo. Of course it could be adjusted in accordance with your own target, more nodes, more clients,…
11 x Raspberry pi

the Model B+ is recommended with 512MB of SDRAM
- 9 RPI for nodes
- 2 RPI for client nodes
11 x 8GB micro SD CARD

2 x Adafruit RGB Negative 16x2 LCD+Keypad Kit
this kit is perfect to build a standalone LCD display and add user interface to our demo.
- 1 plate for client DC1
- 1 plate for client DC2
9 x Raspberry Pi B+ 4-layer Dog Bone Stack Clear Case Box Enclosure
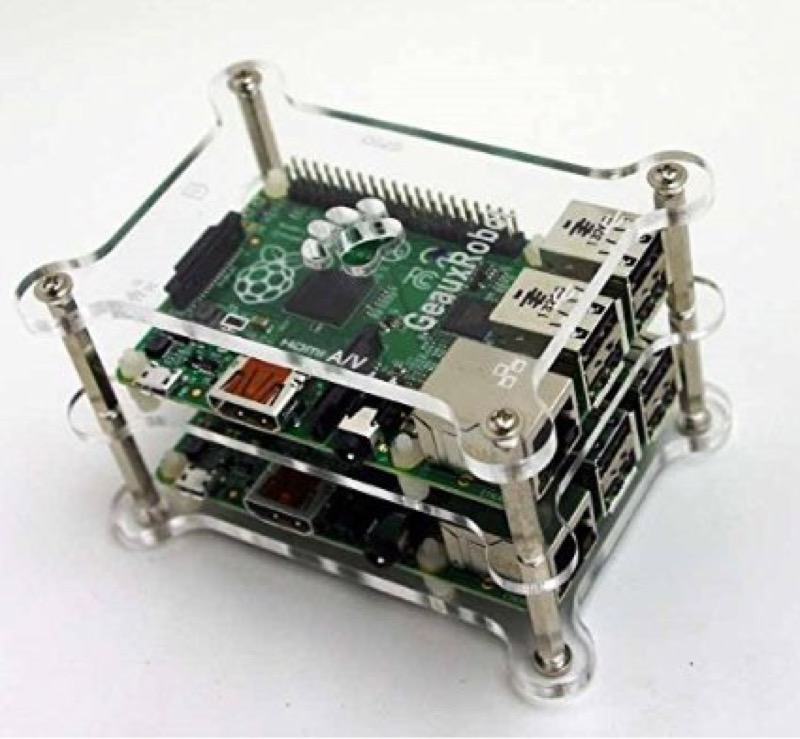
these Clear stackable box enclosures are really great to rack your Raspberry PIs and especially in our demo where we simulate a Datacenter rack !
1 x mini PC

this mini PC (in this demo a Zbox) runs Ubuntu Desktop 14.04 and OpsCenter from DataStax.
1 x monitor
In this demo, a 19.5” color monitor is integrated to the panel for displaying the OpsCenter dashboard.
1 x 5V power supply

Typically, the Raspberry pi Model B+ has efficient power circuits and can use between 600-2000mA, so we need a good power supply for switching our DCs on. As we insert emergency stop buttons, we need to do some small changes to the circuit.
To power the 10 Raspberry pi nodes (the 2 client nodes will be powered by the miniPC USB ports), we select a generic power supply with enough power. This one is cheap and working quite well ! Please add also some Connector Strips to gather power cables.
2 x 8-port 10/100 Mbps switches

These switches will connect all RaspberryPI nodes all together. One switch per Datacenter.
13 x 1.5m Cat5 RJ45 Ethernet Network Cable

1.5m cables are ok. Since I’d a set of 3m cables I’ve used them but a little bit messy with this extra length…
1 x Soldering iron

In this demo we need to solder some parts like the emergency stop buttons and the LCD display panels. If you do not have any soldering iron or station, you could find one like this
Other stuffs
- 1 x white wood panel (120cm x 100cm)
- 1 x 6-port Power Distribution Unit (PDU)
- 4 x colored shelf unit
- some fun stickers :-)
- elbow grease
- …
RaspberryPI configuration
Basic configuration
Unbox all your RPI devices and for each of them, please, follow these steps :
- Install Raspbian on your card. To see how to install raspbian, please look at here
- Insert into your RPI your raspbian card.
- Connect your RPI to a HDMI monitor
- Connect your network cable to RPI (DHCP is enabled by default)
- Power your RPI by plugin with microUSB cable ()
- 1st boot, please change your timezone, keyboard and finish by expanding filesystem
- After booting you could login as user:pi and password:raspberry
- If you are connected to the network, you could update your RPI (http://www.raspberrypi.org/documentation/raspbian/updating.md)
- modify root password :
sudo suthenpasswd(keep these credentails, we will use them for installing DataStax agents)
Your RPI is ready for next configurations :-)
Cassandra node configuration
Since we’d configured the RPI, we’ve to install Cassandra on 9 nodes (6 for DC1 and 3 for DC 2). Please ensure your RPI node is connected to Internet before carry on configurations.
Install Oracle JDK 8
- login as raspberry / pi
Since Cassandra has been developed in Java, we need to install the Oracle JDK 8 on our RPI. Please follow the following steps
- Check your Java version
# java -version
Java version "1.8.0"
Java(TM) SE Runtime Environment (build 1.8.0-b132)
Java HotSpot(TM) Client VM (build 25.0-b70, mixed mode)
then update the root .bashrc. To find the correct path to your java, run ls -lah /etc/alternatives/java
lrwxrwxrwx 1 root root 51 Sep 8 23:50 /etc/alternatives/java/ -> /usr/lib/jvm/jdk-8-oracle-arm-vfp-hflt/jre/bin/java
in our example it is : /usr/lib/jvm/jdk-8-oracle-arm-vfp-hflt
sudo vi /root/.bashrc
export JAVA_HOME=/usr/lib/jvm/jdk-8-oracle-arm-vfp-hflt
export PATH=$JAVA_HOME/bin:$PATH
Download Apache Cassandra
We’ll use the latest stable release of Cassandra (here the 2.1.2).
- login as raspberry / pi
- As your RPI is connected to Internet by a DHCP IP address, we download the package :
wget http://mir2.ovh.net/ftp.apache.org/dist/cassandra/2.1.2/apache-cassandra-2.1.2-bin.tar.gz tar -xvsf apache-cassandra-2.1.2-bin.tar.gzsudo mv apache-cassandra-2.1.2 /opt/cassandrasudo nano /opt/cassandra/conf/cassandra-env.sh
find the line where you have -XX:+UseCondCardMark” and comment the block out with #’s)
#if [ "$JVM_ARCH" = "64-Bit" ] ; then
#    JVM_OPTS="$JVM_OPTS -XX:+UserCondCardMark"
#fi
then we adjust our root .bashrc for Cassandra HOME :
sudo vi /root/.bashrc
export JAVA_HOME=/usr/lib/jvm/jdk-8-oracle-arm-vfp-hflt
export CASSANDRA_HOME=/opt/cassandra
export PATH=$CASSANDRA_HOME/bin:$JAVA_HOME/bin:$PATH
GPU_mem
By default, the RaspberryPI uses 64M for the GPU and since Cassandra needs the maximum of memory, we will tweak the RPI boot config file to reduce the GPU mem to 16M instead of 64M.
sudo nano /boot/config.txt
Edit and append these lines :
# Memory split ARM/GPU
gpu_mem=16
gpu_mem_256=48
gpu_mem_512=48
Snappy
(see this post)
Snappy is a compression library used in Cassandra and you should rebuild a native library for Raspberry-PI from the source code :
- Download snappy-java 1.0.5 source.
wget https://snappy-java.googlecode.com/files/snappy-java-1.0.5-M4.tar.gz tar -xvsf snappy-java-1.0.5-M4.tar.gzcd snappy-java-1.0.5-M4/- Modify Makefile :
sudo nano Makefile
find the following lines :
linux-armhf:
	$(MAKE) native CROSS_PREFIX=arm-linux-gnueabihf- OS_NAME=Linux OS_ARCH=armhf

clean-native-linux32:
and modify the lines to look like this:
linux-armhf:
    $(MAKE) native CROSS_PREFIX=arm-linux-gnueabihf- OS_NAME=Linux OS_ARCH=armhf

linux-raspi:
    $(MAKE) native OS_NAME=Linux OS_ARCH=armhf

clean-native-linux32:
make linux-raspicd target/classeswget https://snappy-java.googlecode.com/files/snappy-java-1.0.5-M4.jarjar uf snappy-java-1.0.5-M4.jar org/xerial/snappy/native/Linux/armhf/libsnappyjava.sosudo mv snappy-java-1.0.5-M4.jar /opt/cassandra/lib/sudo cd /opt/cassandra/lib/-
sudo rm /opt/cassandra/lib/snappy-java-1.0.4.1.jar -
Check if Cassandra is starting correctly with that snappy :
sudo /opt/cassandra/bin/cassandra -fyou should see :Listening for thrift clients…
If so, Cassandra has started successfully.
Hostname, IP addresses
Firstable, we have to edit the hostname and IP address of each node. The node name is using the following syntax : “rpidcxrynz” where x is the DC number, y the RACK number and z the position in the rack :
DC1
| RACK 1 | RACK 2 | RACK 3 |
|---|---|---|
| rpidc1r1n1 : 192.168.11.11 | rpidc1r2n1 : 192.168.11.21 | rpidc1r3n1 : 192.168.11.31 |
| rpidc1r1n2 : 192.168.11.12 | rpidc1r2n2 : 192.168.11.22 | rpidc1r3n2 : 192.168.11.32 |
DC2
| RACK 1 |
|---|
| rpidc2r1n1 : 192.168.11.41 |
| rpidc2r1n2 : 192.168.11.42 |
| rpidc2r1n3 : 192.168.11.43 |
So we need to modify the hostname and IP address of each node and do not forget to use some stickers with the node name so that they are easy to locate ! :-)
For each node :
- Login as raspberry / pi
sudo nano /etc/hostname
modify the name of your RPI (ex : rpidc1r1n1)
rpidc1r1n1
sudo nano /etc/hosts
append the list of all cassandra nodes with their names and addresses :
192.168.11.11	rpidc1r1n1
192.168.11.12	rpidc1r1n2
192.168.11.21	rpidc1r2n1
192.168.11.22	rpidc1r2n2
192.168.11.31	rpidc1r3n1
192.168.11.32	rpidc1r3n2

192.168.11.41	rpidc2r1n1
192.168.11.42	rpidc2r1n2
192.168.11.43	rpidc2r1n3
sudo vi /etc/resolv.conf
append DNS nameservers
nameserver	8.8.8.8
nameserver	8.8.4.4
- Change the DHCP IP address by a fixed IP
sudo nano /etc/network/interfaces
Simply change the line that reads:
iface eth0 inet dhcp
to
iface eth0 inet static
Then directly below this line enter the following IP parameters (example for rpidc1r1n1 : 192.168.11.11)
iface eth0 inet static
address 192.168.11.11
netmask 255.255.255.0
network 192.168.11.0
- reboot :
sudo reboot
Cassandra configuration files
At this stage, we have 9 RPI nodes with java, cassandra, snappy, hostname, ip address, … installed and all nodes have at least once rebooted.
Now we’re getting down to business, the Cassandra cluster configuration ! :-)
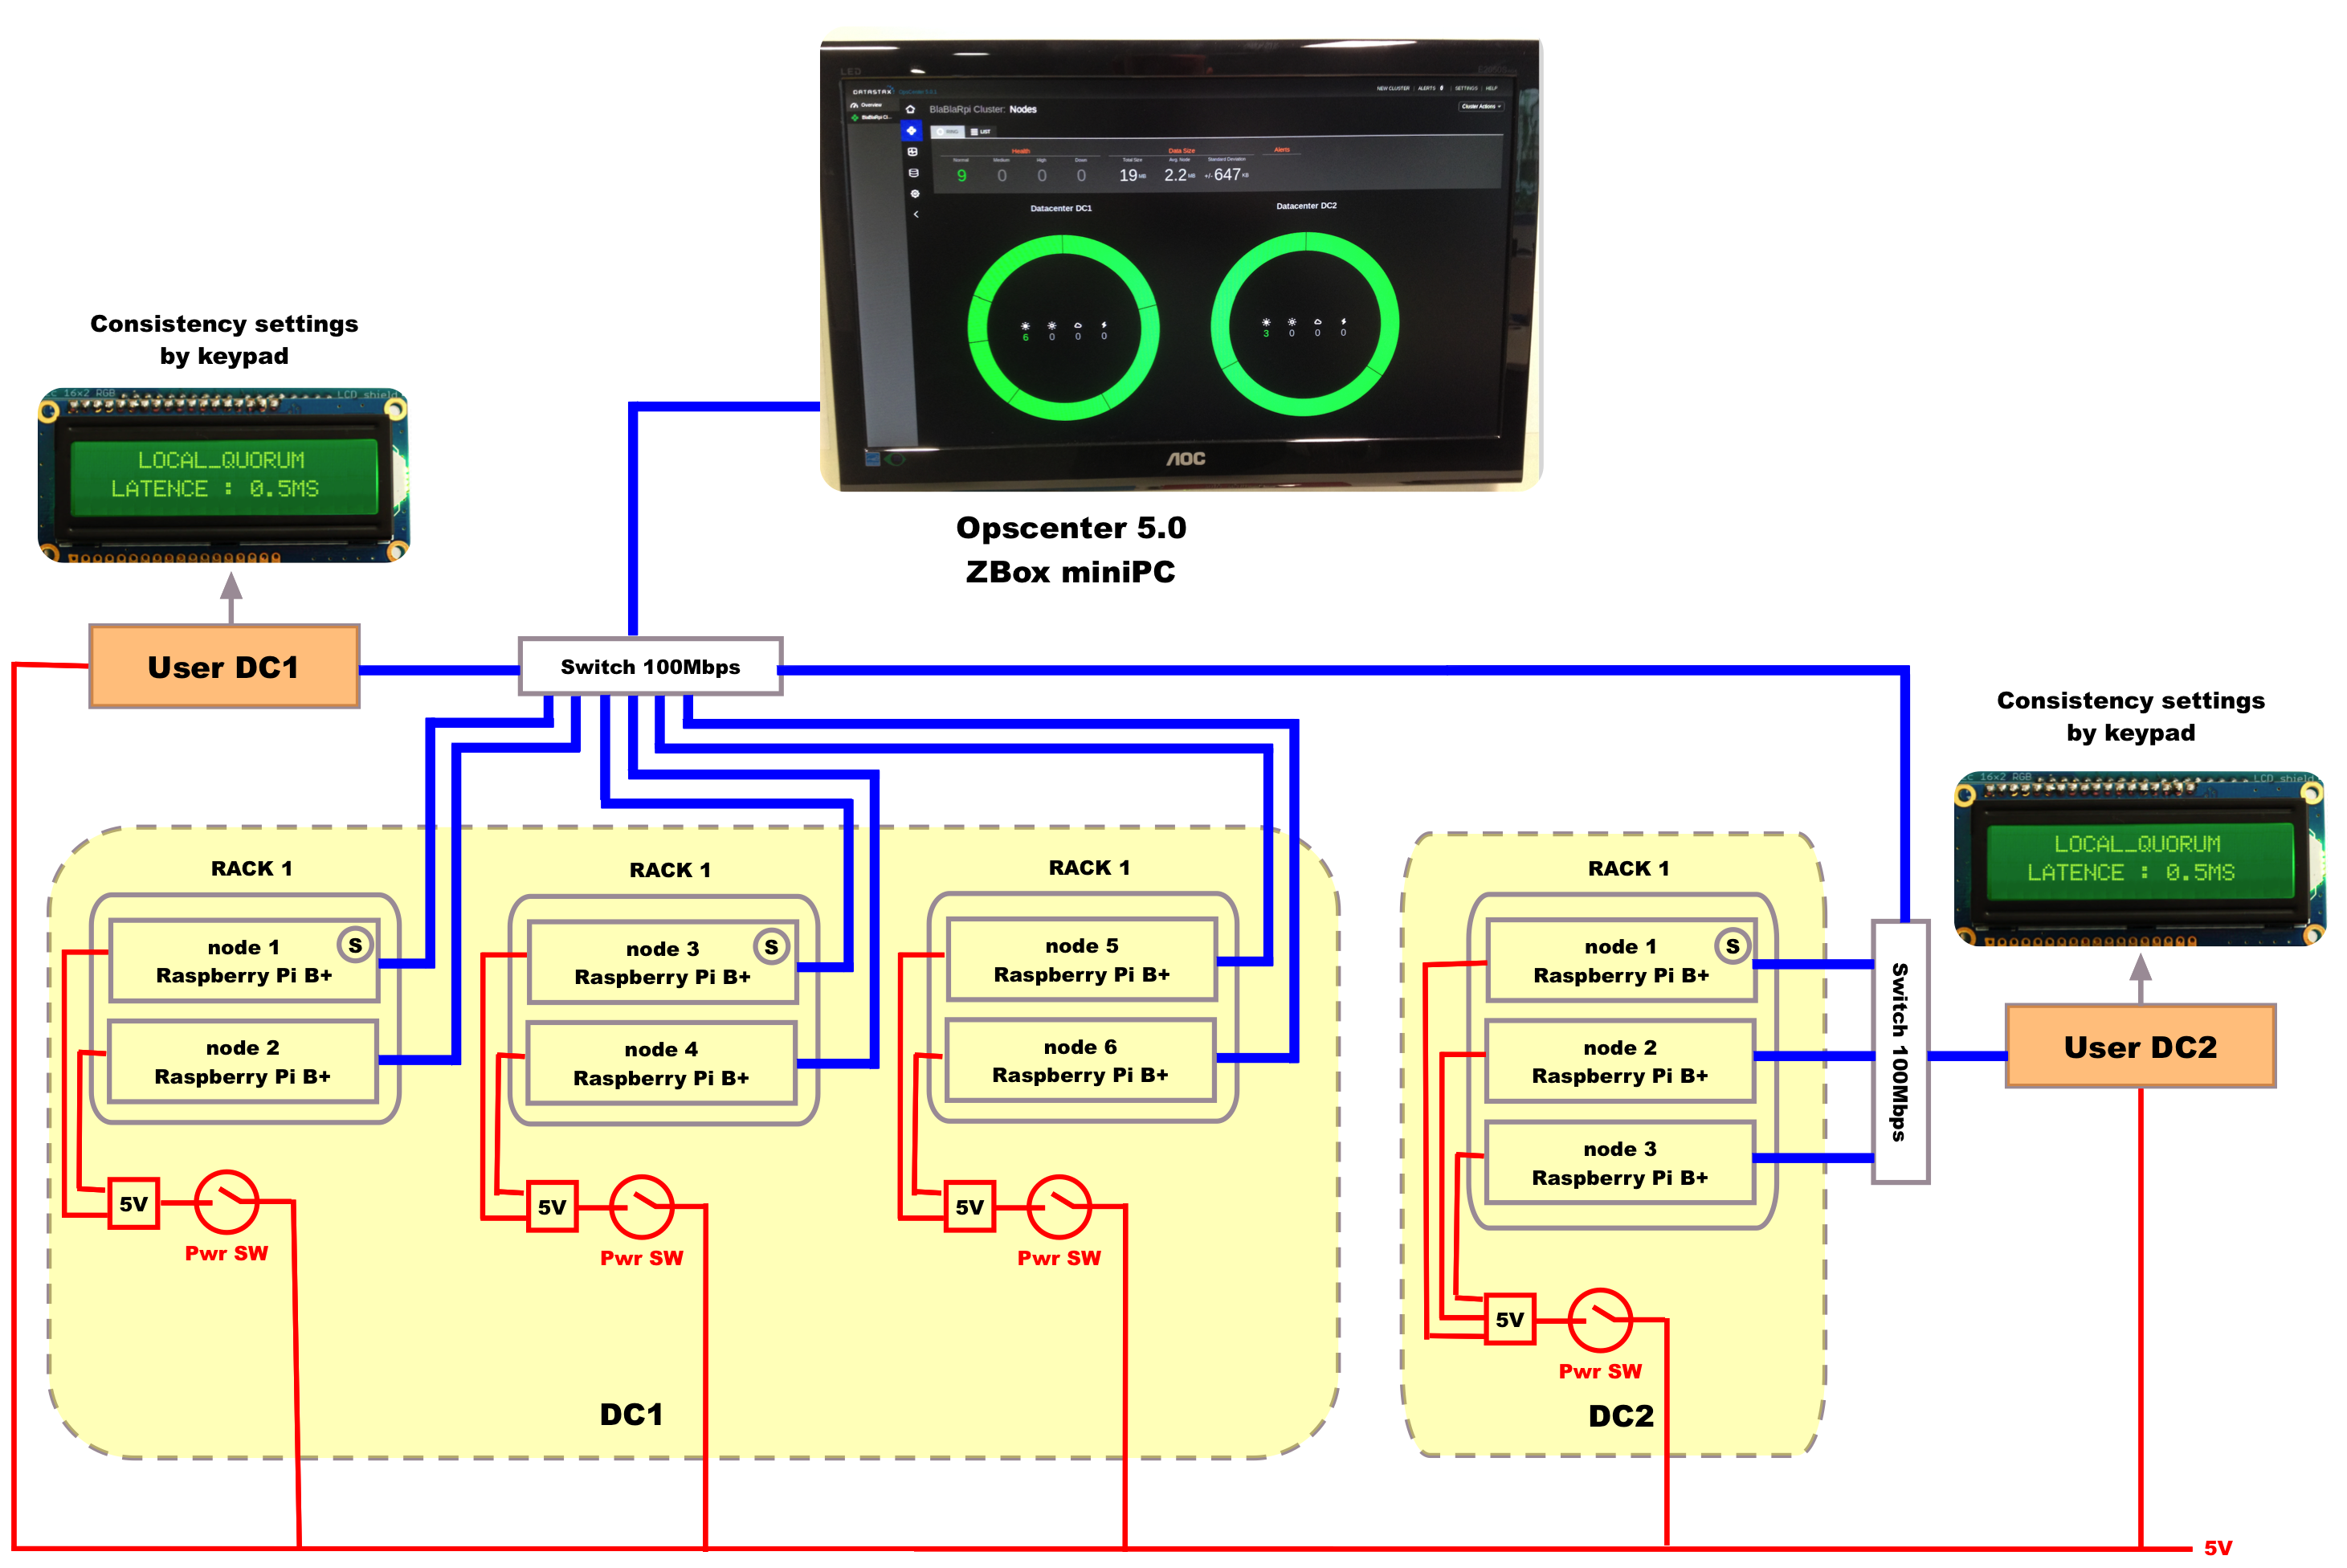
We will set-up this cluster with the following properties :
- 9 nodes cluster
- 2 DCs (DC1, DC2)
- 3 Racks in DC1, 1 Rack in DC2 (see previous section)
- 2 seed nodes in DC1 (rpidc1r1n1 & rpidc1r2n1)
- 1 seed node in DC2 (rpidc2r1n1)
We need to tweak some parameters in the global cassandra.yaml file to fit the RPI limitations, find the following lines and edit their values :
sudo nano /opt/cassandra/conf/cassandra.yaml
cluster_name: 'BlaBlaRpi Cluster'	(<- your cluster name)
...
seed_provider:
	# Addresses of hosts that are deemed contact points.
	# Cassandra nodes use this list of hosts to find each other and learn
	# the topology of the ring.  You must change this if you are running
	# multiple nodes!
	- class_name: org.apache.cassandra.locator.SimpleSeedProvider
  	parameters:
      	# seeds is actually a comma-delimited list of addresses.
      	# Ex: "<ip1>,<ip2>,<ip3>"
      	- seeds: "192.168.11.11,192.168.11.21,192.168.11.41" (<- here are the seed IP addresses, the same on all nodes)
...
concurrent_reads: 2
concurrent_writes: 2
concurrent_counter_writes: 2
...
listen_address: 192.168.11.11	(<- put the node IP address)
...
rpc_address: 192.168.11.11	(<- put the node IP address)
...
endpoint_snitch: PropertyFileSnitch
...
then we define the topology of the cluster with 2 DCs & Racks :
sudo nano /opt/cassandra/conf/cassandra-topology.properties
# Cassandra Node IP=Data Center:Rack
# DC1
192.168.11.11=DC1:RAC1
192.168.11.12=DC1:RAC1

192.168.11.21=DC1:RAC2
192.168.11.22=DC1:RAC2

192.168.11.31=DC1:RAC3
192.168.11.32=DC1:RAC3

# DC2
192.168.11.41=DC2:RAC1
192.168.11.42=DC2:RAC1
192.168.11.43=DC2:RAC1

# default for unknown nodes
default=DC1:RAC1
That’s it ! Cluster is configured ! Simple, isn’t it ? :-)
Let’s try now if your cluster is working correctly.
Launch the cluster !
In a cluster, all nodes have to see each other so we will unbox our 2 switches and connect the first 6 x DC1 nodes to the 1st switch and the 3 x DC2 nodes to the 2nd switch. Do not forget of course to link the 2 switches together :-) The cluster network is 192.168.11.0 you may connect your router with the LAN port on this network to provide internet access to all nodes for loading some external modules (python, …).
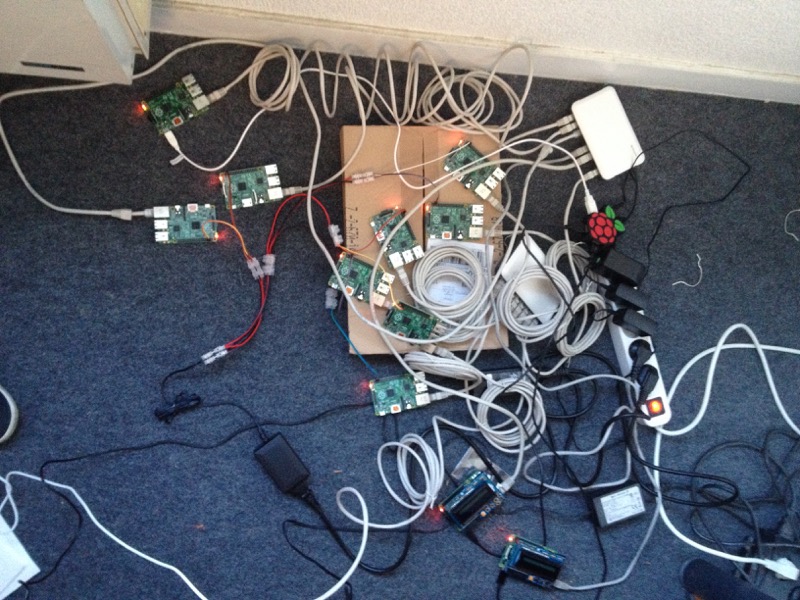
You could see on my ‘messy’ floor :-), my RPIs connected to switches. Do not pay attention to the 2 other RPIs with LCD display, we will see them later. However, I’m sure you will stop and ask me : “Wait dude !!!..what about the power for my RPIs ? What are these black & red cables ???”
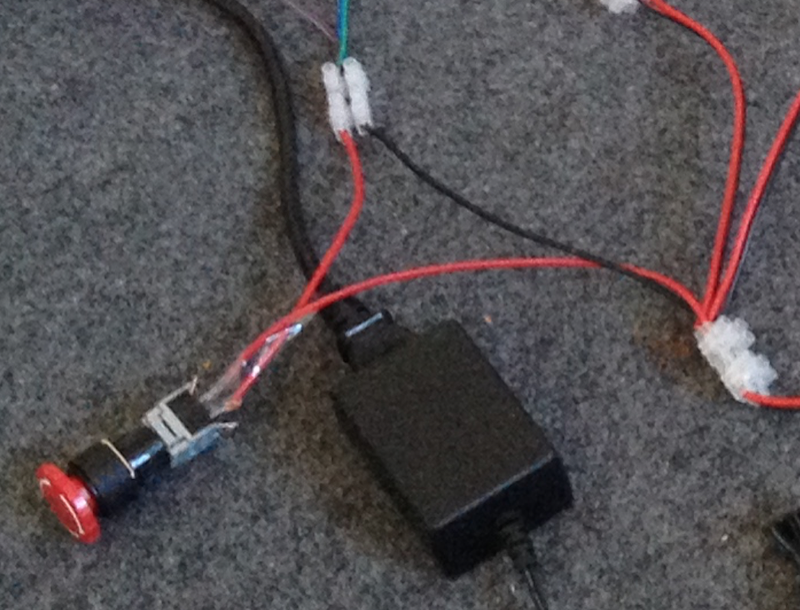
As said previously in the list of material, we will use a generic power supply to power all nodes instead of having many microUSB cable connected to many USB hubs…However if you prefer to use some USB Power switch like PiHub please skip following instructions.
Otherwise, if you prefer to improve your DIY side, you could cut off the end of the main power cable and through multiples strip connectors you connect all the nodes as decribed in my quick & dirty sketch….below :
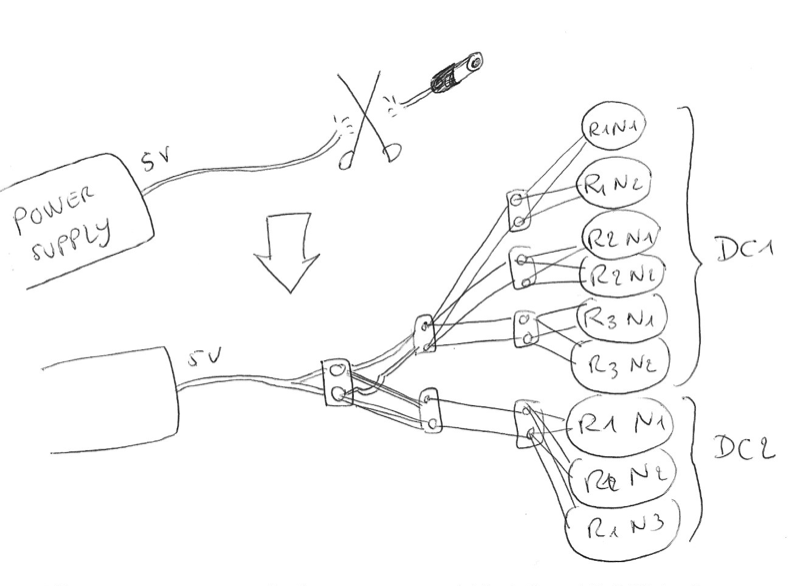
Once you’ve cut the main cable and link the extra cables, you could use extra jumper wires to plug them to the right GPIO pins for the Raspberry pi B+ (which are the pins 4 (5V) & 6 (Ground)) :

Every nodes are up and running Raspbian and you feel the power of your coming cluster ! So, the first thing to do before starting the cluster for the first time is to ensure there is nothing remaining on the data directory of Cassandra. So on all nodes, please type this command :
sudo rm -rf /opt/cassandra/data/*/*
Then we have to start first the seeds :
- On rpidc1r1n1 :
sudo /opt/cassandra/bin/cassandra -fthen wait for “Listening for thrift clients….” - On rpidc1r2n1 :
sudo /opt/cassandra/bin/cassandra -fthen wait for “Listening for thrift clients….” - On rpidc2r1n1 :
sudo /opt/cassandra/bin/cassandra -fthen wait for “Listening for thrift clients….”
Once seeds have started successfully, we start the other nodes, standard nodes :
- On other nodes :
sudo /opt/cassandra/bin/cassandra -fthen wait for “Listening for thrift clients….”
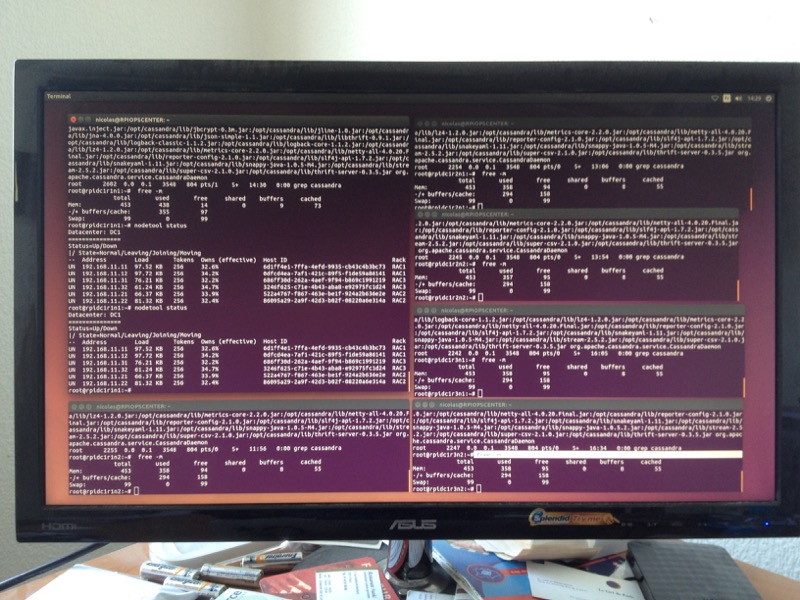
When all these nodes are running, you could open a new terminal on the first node (rpidc1r1n1 for example) and get the cluster status :
sudo nodetool status
if your cluster is running well, you get something like that :
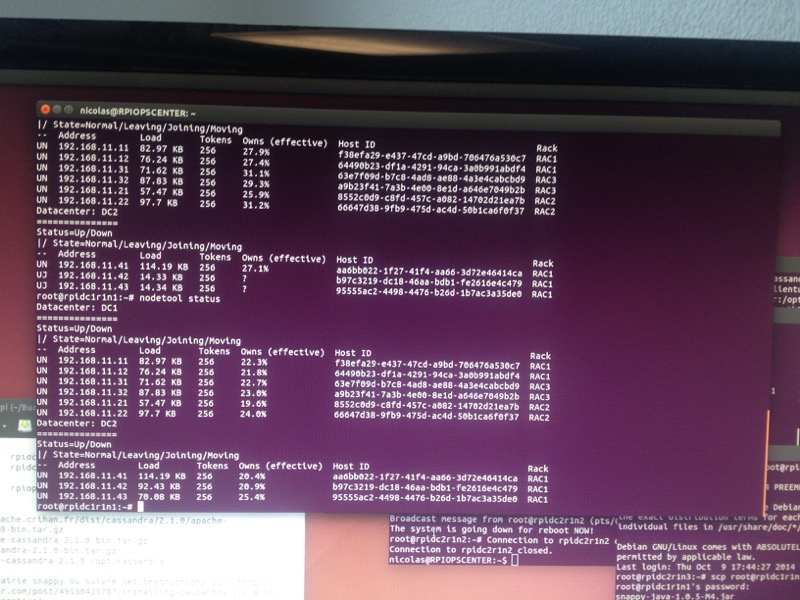
You have to see 2 distinct parts for each DC and for each DC, the list of all nodes with their Rack position and status (2 letters in the first column : UN = Up Node, DN = Down Node)
So each node has to be UN and the 2 DCs listed.
If not, please check connectivity between all nodes (switch, cables, IP addresses, network mask,…) and do not hesitate to redo the previous steps.
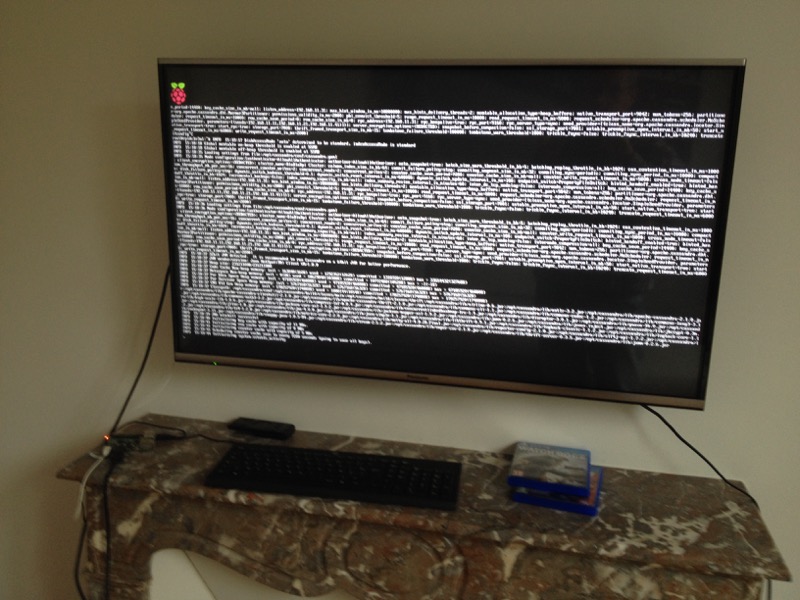
(debug in my office and also… in the living room with my son on the PS4 flat TV ! :-)
So if your cluster is up and running, you could try to fire clqsh to validate your environment :
- login as raspberry / pi on one node (ex : rpidc1r1n1)
sudo cqlsh rpidc1r1n1
you will get the cqlsh prompt
Connected to BlaBlaRpi Cluster at rpidc1r1n1:9042.
[cqlsh 5.0.1 | Casandra 2.1.0 | CQL spec 3.2.0 | Native protocol v3]
Use HELP for help.
cqlsh>
You could type ( Ctrl + D ) to exit cqlsh.
Automatic launching
Our cluster is running but if we have to reboot one node, we have to start Cassandra manually again, not a good idea. So to automate this Cassandra ‘daemon’, we will just add the following line to our /etc/rc.local :
sudo nano /etc/rc.local
and add this line just before the exit 0 :
/opt/cassandra/bin/cassandra

exit 0
Do the same on all nodes and reboot all the nodes, may be not at the same time if your are not condident ! :-)
OpsCenter node
To monitor our new Cassandra Cluster, we use DataStax OpsCenter which is really simple to use. The first thing to do is to prepare the mini pc with a linux OS like Ubuntu Desktop 14.04
modify the IP address to be on the same LAN of your Cassandra Cluster :
for example : 192.168.11.1
I’ve added a WIFI dongle to this mini-pc to use it as a gateway to Internet for my RPI nodes.
we could also add the cassandra node IP addresses to /etc/hosts
sudo nano /etc/hosts
append the list of all cassandra nodes with their names and addresses :
192.168.11.11	rpidc1r1n1
192.168.11.12	rpidc1r1n2
192.168.11.21	rpidc1r2n1
192.168.11.22	rpidc1r2n2
192.168.11.31	rpidc1r3n1
192.168.11.32	rpidc1r3n2

192.168.11.41	rpidc2r1n1
192.168.11.42	rpidc2r1n2
192.168.11.43	rpidc2r1n3
Once logged, we install OpsCenter by download the binary
To launch OpsCenter, you’ve just to open the url :
http://localhost:8888
I invite you to read the documentation to fully understand how OpsCenter works.
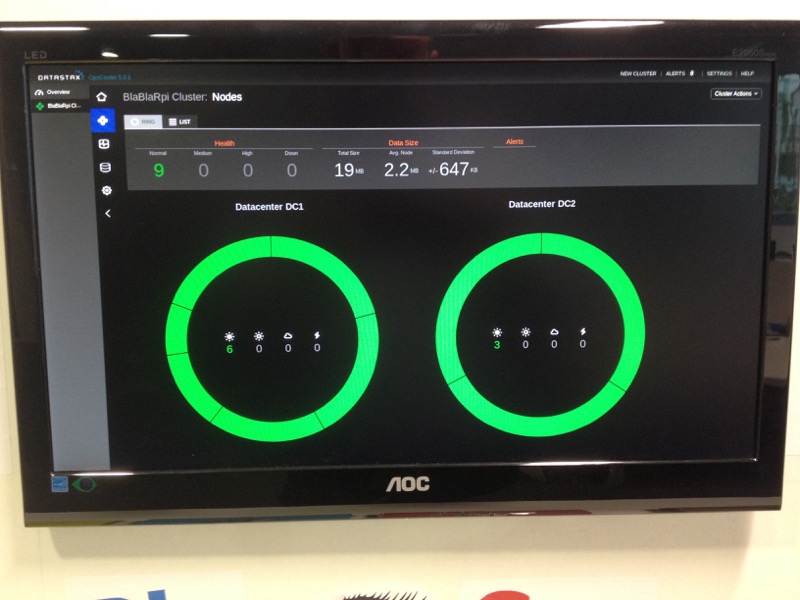
To complete this section, we have to add a new cluster to opsCenter
- Add new cluster
- Manage existing cluster
- Enter at least one hostname or IP address for the a node in the cluster (for example : rpidc1r1n1)
- Add Cluster
You could then install DataStax agents to each Cassandra nodes by clicking on the ‘connect agents’ link in the top of screen. Use the root credentials for giving access to the nodes
Client node configuration
We have previously set up a running Cassandra cluster. We will prepare, now, two client nodes to write to the cluster with different level of consistency.

Hostname, IP addresses
So each of these 2 nodes have the basic configuration. Firstable, we have to edit the hostname and IP address of each node. The node name is using the following syntax : “rpidcxuser” where x is the DC number :
| DC1 | DC2 |
|---|---|
| rpidc1user : 192.168.11.100 | rpidc2user : 192.168.11.200 |
For each node :
- Login as raspberry / pi
sudo nano /etc/hostname
modify the name of your RPI (ex : rpidc1user1)
rpidc1user1
sudo nano /etc/hosts
append the list of all cassandra nodes with their names and addresses :
192.168.11.11	rpidc1r1n1
192.168.11.12	rpidc1r1n2
192.168.11.21	rpidc1r2n1
192.168.11.22	rpidc1r2n2
192.168.11.31	rpidc1r3n1
192.168.11.32	rpidc1r3n2

192.168.11.41	rpidc2r1n1
192.168.11.42	rpidc2r1n2
192.168.11.43	rpidc2r1n3

192.168.11.100	rpidc1user
192.168.11.200	rpidc2user
sudo vi /etc/resolv.conf
append DNS nameservers
nameserver	8.8.8.8
nameserver	8.8.4.4
- Change the DHCP IP address by a fixed IP
sudo nano /etc/network/interfaces
Simply change the line that reads:
iface eth0 inet dhcp
to
iface eth0 inet static
Then directly below this line enter the following IP parameters (example for rpidc1user : 192.168.11.100)
iface eth0 inet static
address 192.168.11.100
netmask 255.255.255.0
network 192.168.11.0
- reboot :
sudo reboot
Install python and Cassandra Driver
Do not forget to connect your RPI on the switch to communicate with the cluster and internet for loading modules.
sudo apt-get install build-essential python-dev python-pip gitsudo pip install cassandra-driversudo apt-get install python-snappysudo pip install blist
we could check the driver by the following script :
$ python
Python 2.7.3 (deafault, Mar 18 2014, 05:13:23)
[GCC 4.6.3] on linux2
Type "help", "copyright", "credits" or "licence" for more information.
>>>
then we enter our test script :
from cassandra.cluster import Cluster
cluster = Cluster(['rpidc1r1n1','rpidc1r1n2'])
session = cluster.connect()
session.set_keyspace('system')
rows = session.execute('SELECT * FROM schema_keyspaces')
for row in rows:
	print row
and you should see something like that :
*Row(keyspace_name=u’OpsCenter’, durable_writes=True, strategy_class=u’org.apache.cassandra.locator.SimpleStrategy’, strategy_options=u’{“replication_factor”:”2”}’) *Row(keyspace_name=u’system’, durable_writes=True, strategy_class=u’org.apache.cassandra.locator.LocalStrategy’, strategy_options=u’{}’) *Row(keyspace_name=u’system_traces’, durable_writes=True, strategy_class=u’org.apache.cassandra.locator.LocalStrategy’, strategy_options=u’{“replication_factor”:”2”}’) *…
Build LCD Display
Since our client is able to interact with our Cassandra cluster, it could be interesting to add an external display and a user interface to tune the Consistency Levels both for writing and reading.
This demo is a good example to mix making and coding for a fun and serious spirit

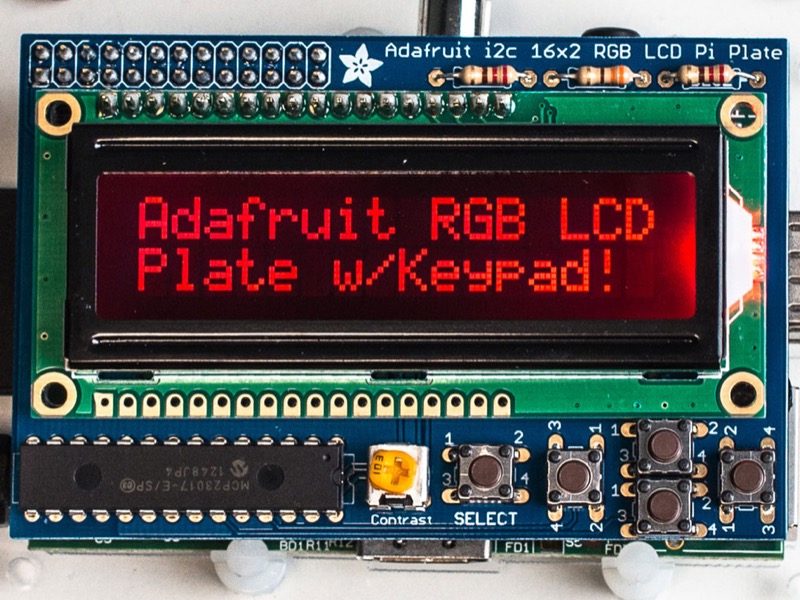
This kit from Adafruit is a Pi plate that lets you control a 16x2 Character LCD, up to 3 backlight pins AND 5 keypad pins using only the two I2C pins on the R-Pi. It is a great
We will use the tiny keypad with a python script to browse consistency levels and select one.
Firstable, you need to solder and build the Adafruit Pi plate. It is not difficult but take your time to make good solder points, you could follow this tutorial to do it and be confident in your work :
When it is done, just plug it on your RPI and switch it on.
Python LCD script
Before writing any code for using our LCD display, we need to install several python modules and tweak some parameters :
sudo vi /etc/modules
Edit the file and append these lines :
snd-bcm2835
i2c-bcm2708
i2c-dev
sudo apt-get install python-smbus i2c-toolssudo i2cdetect -y 1to check if the lCD is recognized on i2c bussudo apt-get updatesudo apt-get install build-essential python-dev python-smbus python-pipsudo pip install RPi.GPIO
then we clone the sample script from github :
git clone https://github.com/adafruit/Adafruit_Python_CharLCD.git
cd Adafruit_Python_CharLCD/
sudo python setup.py install
cd examples/
and we test the sample script by running :
sudo python char_lcd_plate.py
This script will display different background colors and after that, by pressing the keypad it displays the key pressed. If you look inside the code, you will see it is really simple and easy to use. Just instantiate a new LCD object and then use some member functions to display text, change color and detect key pressure.
Ok, that sounds good ! Let start with our demo code to interact with our cluster and browse/select the desired Consistency Level. So you could place your script wherever you want, in your home directory for example :
cdvi lcd.py
enter this code :
#!/usr/bin/python
# -*- coding: utf-8 -*-
import uuid,time,datetime,sys
import cassandra
from cassandra.cluster import Cluster
from cassandra.pool import Host
from cassandra.policies import DCAwareRoundRobinPolicy, SimpleConvictionPolicy
from cassandra import ConsistencyLevel
import Adafruit_CharLCD as LCD
import time
import pprint
from cassandra.query import SimpleStatement
from cassandra import (Unavailable, Timeout, WriteTimeout, ReadTimeout, AlreadyExists, InvalidRequest, Unauthorized, AuthenticationFailed, OperationTimedOut)
from cassandra.cluster import (QueryExhausted, NoHostAvailable, UserTypeDoesNotExist)
import logging
import unicodedata
import re

logging.basicConfig(filename='lcd.log',level=logging.DEBUG,format='%(asctime)s %(message)s')

class InfoFilter(logging.Filter):
    def filter(self, rec):
	return 'register' not in rec.getMessage()

for handler in logging.root.handlers:
	handler.addFilter(InfoFilter())


# Init Consistency values
consistencies = {'ALL':ConsistencyLevel.ALL,'ANY':ConsistencyLevel.ANY,'EACH_QUORUM':ConsistencyLevel.EACH_QUORUM,'LOCAL_ONE':ConsistencyLevel.LOCAL_ONE,'LOCAL_QUORUM':ConsistencyLevel.LOCAL_QUORUM,'LOCAL_SERIAL':ConsistencyLevel.LOCAL_SERIAL,'ONE':ConsistencyLevel.ONE,'QUORUM':ConsistencyLevel.QUORUM,'SERIAL':ConsistencyLevel.SERIAL,'THREE':ConsistencyLevel.THREE,'TWO':ConsistencyLevel.TWO}

consistenciesWrite = ['ONE','TWO','THREE','QUORUM','LOCAL_ONE','LOCAL_QUORUM','EACH_QUORUM','ANY','ALL']
consistenciesRead = ['ONE','TWO','THREE','QUORUM','LOCAL_ONE','LOCAL_QUORUM','EACH_QUORUM','ALL']

consistencyWrite = 'LOCAL_ONE'
consistencyRead = 'ONE'

localDC = 'DC1'
# Initialize the LCD using the pins
lcd = LCD.Adafruit_CharLCDPlate()

buttons = ( (LCD.SELECT, 'Select', (1,1,1)),
            (LCD.LEFT,   'Left'  , (1,0,0)),
            (LCD.UP,     'Up'    , (0,0,1)),
            (LCD.DOWN,   'Down'  , (0,1,0)),
            (LCD.RIGHT,  'Right' , (1,0,1)) )

CONST_consistency_write = consistencies[consistencyWrite]
CONST_consistency_read = consistencies[consistencyRead]
t1=0
t2=0

# Prepared statements

def afficherLCD(ligne1,ligne2,couleur=(0.0,0.0,1.0)):
    global lcd,localDC
    lcd.set_color(couleur[0],couleur[1],couleur[2])
    lcd.clear()
    lcd.message(ligne1+'\n'+ligne2)
    print localDC+" "+time.strftime("%H:%M:%S")+" : "+ligne1+" - "+ligne2

def afficherMsg(ligne1,ligne2,couleur=(0.0,0.0,1.0)):
	afficherLCD(ligne1,ligne2,couleur)

def afficherErr(ligne1,ligne2,couleur=(1.0,0.0,0.0)):
	afficherLCD(ligne1,ligne2,couleur)

def displayConsistency(bWrite=True):
	global consistencyWrite,consistencyRead
	if bWrite:
		ligne1 = '- CL WRITE -'.center(16)
		ligne2 = '< '+consistencyWrite.center(12)+' >'
		afficherMsg(ligne1,ligne2,(0.0,0.0,1.0))
	else:
		ligne1 = '- CL READ -'.center(16)
		ligne2 = '< '+consistencyRead.center(12)+' >'
		afficherMsg(ligne1,ligne2,(0.0,1.0,0.0))

def setConsistency(bWrite=True):
    global consistencyWrite,consistencyRead,lcd
    if bWrite:
    	displayConsistency(True)
    else:
    	displayConsistency(False)
    time.sleep(1)
    while True:
    	if lcd.is_pressed(LCD.SELECT):
            break

    	if lcd.is_pressed(LCD.RIGHT):
            if bWrite:
        		idx = consistenciesWrite.index(consistencyWrite)
        		idx = (idx + 1) % len(consistenciesWrite)
        		consistencyWrite = consistenciesWrite[idx]
        		displayConsistency(True)
        	else:
        		idx = consistenciesRead.index(consistencyRead)
        		idx = (idx + 1) % len(consistenciesRead)
        		consistencyRead = consistenciesRead[idx]
        		displayConsistency(False)

        if lcd.is_pressed(LCD.LEFT):
                if bWrite:
                        idx = consistenciesWrite.index(consistencyWrite)
                        idx = (idx - 1) % len(consistenciesWrite)
                        consistencyWrite = consistenciesWrite[idx]
                        displayConsistency(True)
                else:
                        idx = consistenciesRead.index(consistencyRead)
                        idx = (idx - 1) % len(consistenciesRead)
                        consistencyRead = consistenciesRead[idx]
                        displayConsistency(False)

def pip():
    global t1
    t1 = datetime.datetime.now()

def pop(msg,couleur=(0.0,0.0,1.0)):
    global t1,t2,lcd,buttons
    t2 = datetime.datetime.now()
    dt = t2 - t1
    ms = (dt.days * 24 * 60 * 60 + dt.seconds) * 1000 + dt.microseconds / 1000.0
    ligne1 = '- '+consistencyWrite.center(12)+' -'
    ligne2 = "%s %0.f ms" % (msg,ms)
    afficherMsg(ligne1,ligne2,couleur)
    t1 = datetime.datetime.now()

def getTimeUUID():
    return uuid.uuid1()

def getTimestamp():
    return datetime.datetime.fromtimestamp(time.time())

def addThread(session,msg):
    global addThread_stmt

    # Init
    id = getTimeUUID()
    creation_date = getTimestamp()

    # Requête
    try:
        pip()
        session.execute(addThread_stmt,[id,msg,creation_date],1.0)
        # I have added nodeIP to the session Object in the Cassandra Python driver to get the coordinator IP
		node = session.cluster.metadata._hosts[session.nodeIP]
		couleur = (0.0,0.0,1.0)
		if  node._datacenter == 'DC1':	couleur = (0.0,1.0,0.0)
		msg = unicodedata.normalize('NFKD', node._datacenter+node._rack+node.address).encode('ascii','ignore')
		pop(re.sub(r"192\.168\.11\..","N",msg.replace('RAC','R'))+" ->",couleur)
        return thread_id
    except Unavailable as e:
		afficherErr('Unavailable','Not enough replicas')
        return None

    except Timeout as e:
		afficherErr('Timeout','Failed to respond')
        return None

    except ReadTimeout as e:
		afficherErr('ReadTimeout','Failed to read')
        return None

    except WriteTimeout as e:
		afficherErr('WriteTimeout','Failed to write')
        return None

    except AlreadyExists as e:
		afficherErr('AlreadyExists','Keyspace/table')
        return None

    except InvalidRequest as e:
		afficherErr('InvalidRequest','query invalid')
        return None

    except Unauthorized as e:
		afficherErr('Unauthorized','User not authorized')
        return None

    except AuthenticationFailed as e:
		afficherErr('AuthenticationFailed','Failed to authenticate')
        return None

    except OperationTimedOut as e:
		print e.last_host._datacenter
		print e.last_host._rack
		print e.last_host.address
		session.remove_pool(e.last_host)
        return None

    except cassandra.cluster.QueryExhausted as e:
		afficherErr('QueryExhausted','no more pages')
        return None

    except cassandra.cluster.NoHostAvailable as e:
		afficherErr('NoHostAvailable','no host available')
        return None

    except cassandra.cluster.UserTypeDoesNotExist as e:
		afficherErr('UserTypeDoesNotExist','User Type undefined')
        return None

setConsistency(True)

print "\033[2J"
pip()
cluster = Cluster(['192.168.11.11','192.168.11.12','192.168.11.21','192.168.11.22','192.168.11.31','192.168.11.32'],load_balancing_policy=DCAwareRoundRobinPolicy(local_dc='DC1',used_hosts_per_remote_dc=3))

pop("CLUSTER")
session = cluster.connect()
session.default_timeout = 0.5
pop("CONNECT")

# Keyspace creation
session.execute("CREATE KEYSPACE IF NOT EXISTS demorpi WITH replication = {'class':'NetworkTopologyStrategy', 'DC1':'3', 'DC2':'3'}")
session.set_keyspace('demorpi')

# Table creation
session.execute("CREATE TABLE IF NOT EXISTS demorpi.messages (id timeuuid PRIMARY KEY,msg text,creation_date timestamp)")

addThread_stmt = session.prepare("INSERT INTO messages (id,msg,creation_date) VALUES (?,?,?)")
addThread_stmt.consistency_level = consistencies[consistencyWrite]
pop("PREPARE")

#time.sleep(5000)
for i in range(1000000):
    addThread(session,2,'Gaëlle',1,'Nicolas','Trajet Rennes-Paris',101+i,1000)
    time.sleep(5)
    if lcd.is_pressed(LCD.SELECT):
        setConsistency(True)
        addThread_stmt.consistency_level = consistencies[consistencyWrite]
To explain what this script is doing, it could be summarized as follow :
- User selects the Write Consistency Level by pressing the LEFT and RIGHT buttons to browse the list and SELECT to validate
- it connects to the Cassandra cluster
- it creates keyspace demorpi and table messages if they do not exist
- Every 5s it writes a new entry to the messages table
- if you keep the SELECT button pressed at least 5s, you could set a new Write COnsistency Level.
**As I’ve to display for the demo which Cassandra coordinator node has been chosen for the write, I’ve added some little modifications to the Cassandra Python driver…ughhhhhh I’m sure there is a nicer way to get this info but at the time I’ve made this script, I did not go deeper. **
here are my modifications in the python driver :
sudo vi /usr/local/lib/python2.7/dist-packages/cassandra/cluster.py
class Session(object):
	...
	cluster = None
	hosts = None
	keyspace = None
	is_shutdown = False

	nodeIP = '' <- I've added this line
sudo vi /usr/local/lib/python2.7/dist-packages/cassandra/pool.py
def borrow_connection(self, timeout):
	...
    self._session.nodeIP = least_busy.addr[0] <- I've added this line
    return least_busy, request_id
Please note this main lcd.py script is intended to run on rpidc1user which is dealing with the first datacenter DC1 as a local DC. You could see that in the Init local DC :
localDC = 'DC1'
but especially in the Cluster definition :
Cluster(['192.168.11.11','192.168.11.12','192.168.11.21','192.168.11.22','192.168.11.31','192.168.11.32'],load_balancing_policy=DCAwareRoundRobinPolicy(local_dc='DC1',used_hosts_per_remote_dc=3))
We declare the cluster with all nodes from DC1 and define the loab balancing policy which is DC aware (load_balancing_policy=DCAwareRoundRobinPolicy) the other parameter used_hosts_per_remote_dc=3 indicates that outside from this localDC there are 3 other nodes defined (the 3 nodes from DC2)
If you want to have more details on all load-balancing policies, please check this link
client node #2
So you have to modify this script to install it on the second client node which is more related to DC2. In this case we will have :
localDC = 'DC2'
but especially in the Cluster definition :
Cluster(['192.168.11.41','192.168.11.42','192.168.11.43'],load_balancing_policy=DCAwareRoundRobinPolicy(local_dc='DC2',used_hosts_per_remote_dc=6))
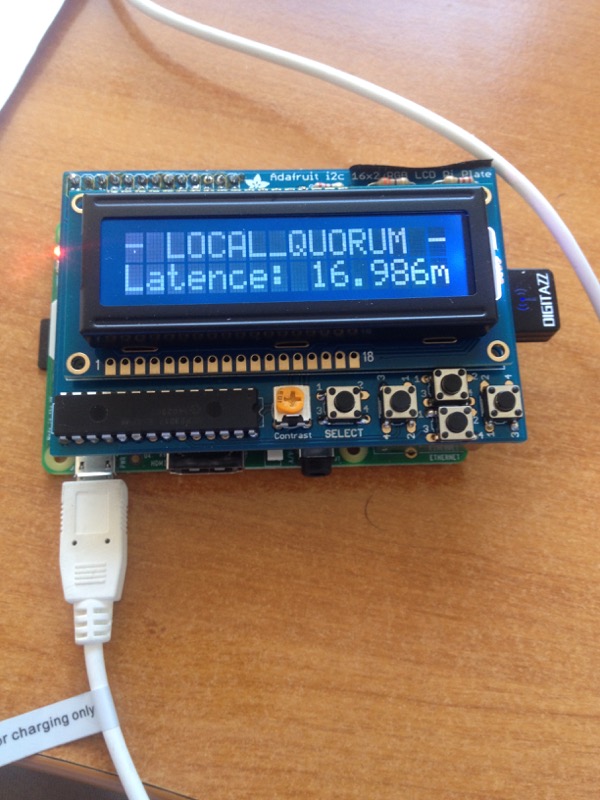
this photo was taken during some debug tests and at that time I was using some WIFI dongle…latency is terrible and for a cassandra cluster… no way ! So use good RJ45 cable, that’s it ! :-)
Autorun client script
As we’ve done with Cassandra, to autorun the script in the LCD display after reboot, we add the following line to our /etc/rc.local :
sudo nano /etc/rc.local
and add this line just before the exit 0 :
python /root/lcd.py &

exit 0
Do the same on both client nodes and reboot them.
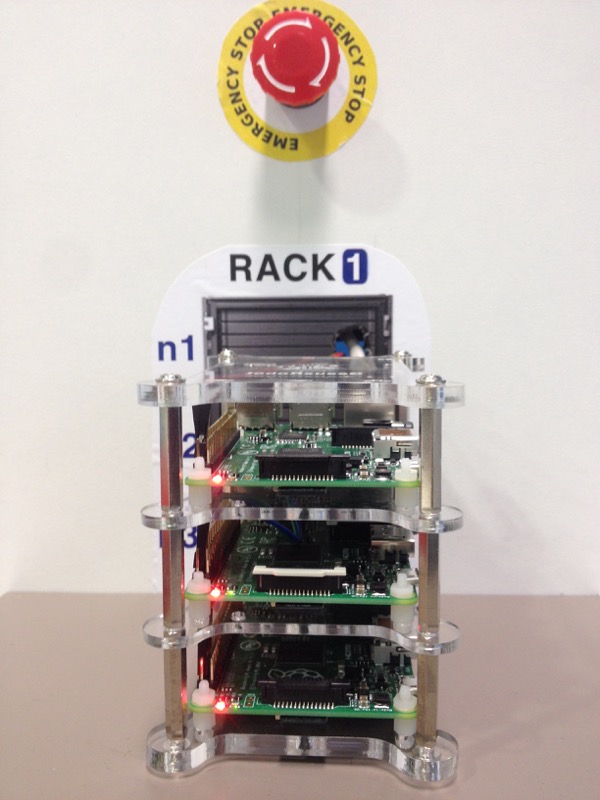
Emergency stop switches
To simulate power loss in a rack or a DC when all racks are shut down, we use Emergency Stop Switch to cut the power with fun and a little drama… It is not production, so enjoy these moments and it will reassure you for your future deployments ! :-)
For this demo, I’ve used this kind of switch

To isolate a rack by controling its power, we need to cut one of the power cables in the middle, the red (5V) cable for example, and connect the ends to the inner pins of the Emergency Stop Switch like in the sketch below :
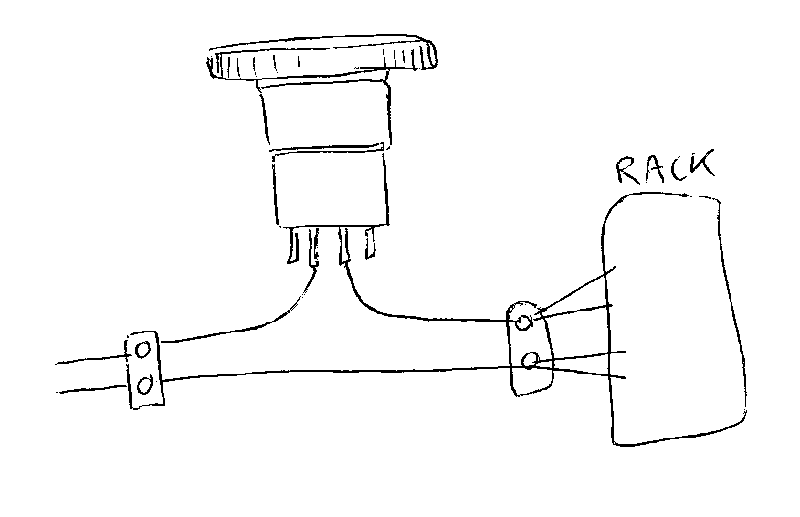
So when the switch is up, the current is flowing across the rack (2 or 3 nodes) and Cassandra is running.
If we push the button, we cut off the power and all nodes in the related rack are shut down. As the RPI are relatively sensitive to current fluctuations, you may see the activity leds of the other nodes blinking when pushing the button.
When you’ve validated one button for the first rack, you could carry on for the 3 other ones.
Final assembly
We have build and configured many elements, Raspberry Pi, LCD, python scripts,… so it is time to gather all these parts into one panel for displaying the demo and attracting dev team’s attention ! :-)
Wood panel
I’ve chosen a 120cm x 100cm Melamine White Panel for pasting easily some stickers on it and emphasizing all the colored shelf units for a great effect (BlaBlaCar logo colors)
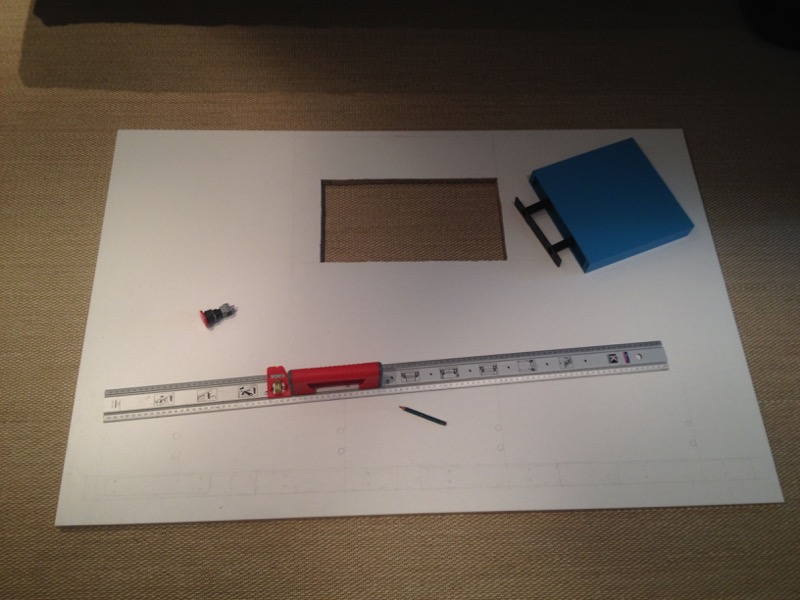
Firstable, you have to cut out the space for the monitor and the 2 client nodes. Then prepare holes for the Emergency Stop switches and calculate equal spaces between the 4 shelf units.
Install the 4 Emergency Stop Switches, the monitor, the shelf units and the differents stickers if you have some :-) You should have something like that :

Now, if we look at ‘Behind the scene’ it is a little bit more epic as we have to connect all the elements :
- Zbox mini-pc
- 2 x 10/100 Mbps switches
- 6-port PDU
- 5V Power supply
- 11 RPIs
- lots of RJ45 and power cables..
- 4 clear box enclosures
- …

For fixing monitor, as I did not have any VESA mount brackets, I’ve just used a piece of wood with screws to secure monitor mounting. Not really great but it works ! :-)
For fixing the two client nodes, it was also quite tricky as I’ve inserted the RPI with its LCD plate within the depth of the wood panel. Doing that way, the LCD fits well on the front and we still have access to the keypad ! On the other side, we apply strong tape on the RPI back to resist to keypad usage.
At last, to make it more rigid, I’ve used 3 metallic clamps to fix it on a table.
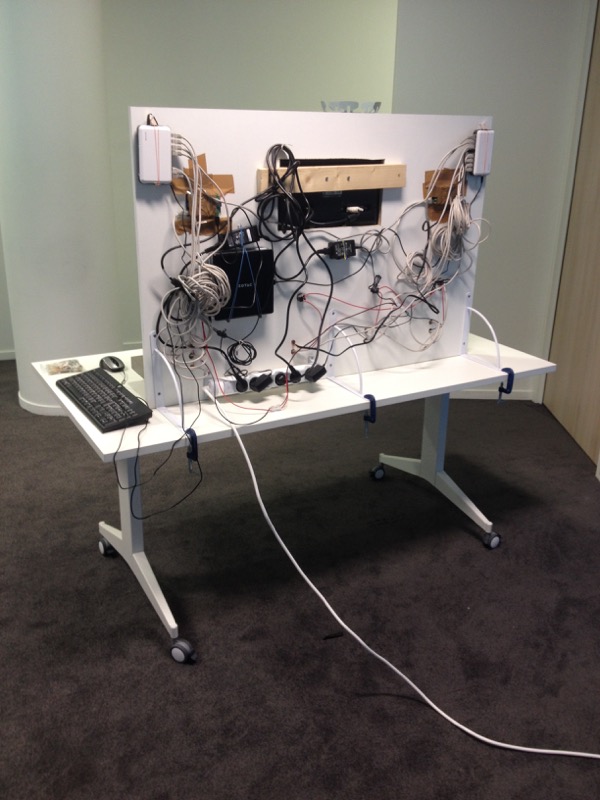

You could use that table to hide your keyboard and mouse so during the demo only the front with RPIs, cases, monito & stickers will be visible !
So with this great Cassandra panel you could do some interactive demos :
- switch off power rack by rack and look at the write behaviour depending on the consistency level. The CL ONE could swap from one DC to another and then the LCD color changes (yeahhh)
- create new python scripts on client nodes to read & write and display useful info on LCD panels
- display on LCD screen the endpoints where data is stored (DC, racks, nodes) and then visualize the nodes concerned by blinking leds
- tune replication factors between the 2 DCs
- … just free your Cassandra imagination ! :-)
Have a good demo with your teams ! :-)
And last but not least,..we’re hiring !